Wednesday 17 September 2014

Cake #25 - Battenberg Cake


Monday Mood Cake - "Girly" Battenberg Cake.

After a nice weekend with a friend, girl friend, I still felt girly on Monday. Seeing and touching numerous princess dresses in numerous shops (like in the Disney Store in Dublin where my friend looked for a dress for her 5-year-old daughter) made me feel a little sad, too (in a good way, though - you know what I mean), because my younger princess just turned 12 and has a good while been interested in teenage stuff rather than princess dresses. At her age I still played with my Barbies.

Inside we can still be princesses. As long as we like. And what the best, we can always bake and eat as many pink and glittery cakes as we like. Even when I am in an old folks home I would love to eat pink cake - mashed, maybe, but still pink and glittery. 

Darn, now that I write this, I remember recently buying some edible gold dust and I could have sprinkled some on this cake! Better save it in case they run out of glitter in the old folks home as the golden olden years may come sooner than I ever can imagine.

Battenberg Cake

250 g butter
300 ml granulated sugar
2 tsp vanilla sugar
3 eggs
500 ml plain flour
1,5 tsp baking powder
100 ml cream
1 tsp red food colouring

Raspberry jam
300 ml icing sugar + 2 tbps water
Red food colouring (or red and blue to make the icing purple)
Marshmallows, sprinkles, gold and silver pearls, gold dust...

1. Heat the oven to 190 degrees C (375 F) and grease and flour (I use dried and ground breadcrumbs) two loaf pans.
2. Mix together the dry ingredients.
3. Cream together butter and sugar.
4. Add eggs and mix well.
5. Add the dry ingredients and cream.
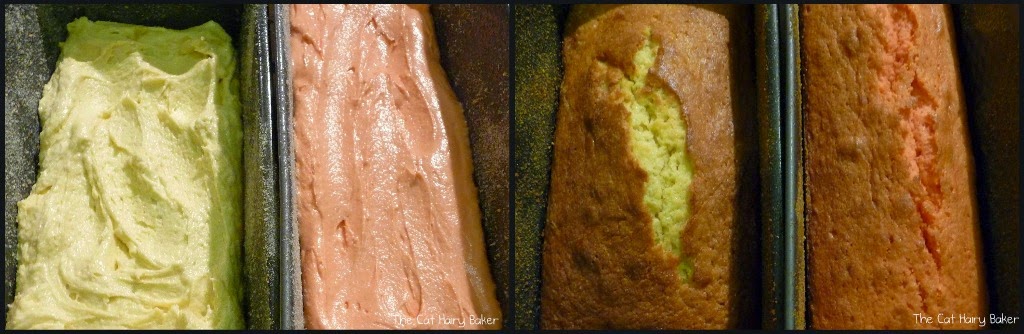
6. Divide the dough in half and colour the other half with red food colouring to make it pink.
7. Pour the dough into the loaf pans.
8. Bake in the oven for 35-30 minutes until solid in the middle.
9. Let cool completely on a rack.
10. Remove the loafs from the pans and cut off the crust except leave on the ones to be the bottom of the cake.
11. Cut the loafs into long rectangles of equal size. I was able to get 9 to make it a 3 x 3 cake.
12. Take 2 tbsp of raspberry jam, add 2 tbsp of water and heat up in the microwave for 30 seconds or so, then mix well. This will be the "glue".
13. "Glue" together your rectangles and press the cake gently but firmly on each side to make the parts stick together.
14. Mix the icing of icing sugar, water and food colouring and spread evenly on the cake.
15. Garnish with "girly stuff" and enjoy in a girly company wearing a crown! (a Burger King one will suit fine)


Tuesday 16 September 2014

Cake #24 - Victoria Sandwich


Sunday Classic Cake - Victoria Sandwich.


I walk on the beach. I can feel that the summer is gone but the wind is not harsh yet. It is gentle. Like the sand I walk on. All sounds are gentle, too. A distant dog barking. A child playing with water. The soft and gentle wind on my hair. I can smell the sea and I can hear it, too. The sea is saying me something. I walk closer to hear.. and I hear the sea saying me gently:

- It is time to go home. Go home. Go home and bake a cake...cake...cake....

In the village, before going home, I go to the little flower market to see if they have any raspberries. None. But they have fresh strawberries. Tiny and so sweet. Perfect shape, each and every strawberry in the box I buy. I pay and say thank you, and when I am at the gate I turn around and say to the man at the market:

- It is time to go home. Go home. Go home and bake a cake...cake...cake....

Victoria Sandwich

Sponge
200 g soft butter
200 g granulated sugar
4 eggs
200 g self-raising flour
1,5 tsp baking powder
2 tbsp cream or milk

400 g fresh strawberries
300 ml fresh cream
2 tbsp sugar
1 tsp vanilla sugar
icing sugar

1. Heat the oven to 190 degrees C (375 F) and grease and flour (I use dried and ground breadcrumbs) a Ø 24 cm cake pan.
2. Mix together the dry ingredients.
3. Cream together butter and sugar.
4. Add eggs and mix well.
5. Add the dry ingredients and cream or milk.
6. Pour the mixture into the pan. 
7. Bake in the oven for 35-30 minutes until solid in the middle.
8. Let cool completely on a rack.
9. Whip the cream together with sugars.
10. Cut the sponge in half.


11. Spread half of the whipped cream on the bottom layer, then place the strawberries on the cream and on top of the strawberries the rest of the cream.
12. Place carefully the other half of the cake on the filled half. Do not press - otherwise the cream and strawberries will come out...
13. Finally, sift icing sugar on top.
14. Stay home and eat the cake, cake, cake...


Monday 15 September 2014

Cake #23 - Brie and Thyme Cake


Savoury Saturday Cake - Brie and Thyme Cake.

I had recently bought a few pots of herbs - parsley, basil, thyme and coriander. The smell of them now fill my kitchen and, unfortunately, not always in a good way. For some reason placing a pot of thyme beside a pot of basil has created an odour similar to cat pee and as we do have two cats I may have blamed the poor felines once or twice - although they are two responsible and mature adult cats who never pee in places where they should not. At least I believe so. Or want to believe so.

Now I wanted to use the thyme for something. My sons see red when they see green. Not that they would be colour-blind but they just hate fresh herbs. So no lamb stew with thyme,  too obvious. Pizza with thyme? No. 

Then I got the idea of hiding some thyme inside a cake together with some junks of Brie cheese. I combined some basic recipes and managed to create a savoury sweetish cake which I will definitely bake again some time! Yummy in everybody's tummy.

You can enjoy it with slices of parma ham and olives to get the savoury taste come through. Or you can enjoy it with some apple sauce or black cherry jam to jump to the sweeter side. 

Brie and Thyme Cake

150 g soft butter
100 ml demerara sugar
2 eggs
½ tsp salt
400 ml plain flour
1 tsp baking powder
50 ml milk

250 g Brie cheese, sliced 
2 tbsp honey
2 tbsp fresh thyme, finely chopped

1. Heat the oven to 175 C / 350 F and grease and flour a Ø 24 cm springform pan.
2. Mix together the dry ingredients.
3. Cream together butter and sugar.
4. Add eggs and mix well.
5. Add the dry ingredients and milk.
6. Pour half of the mixture into the pan. 
7. Place the Brie slices on the dough, add honey drop by drop and then sprinkle the chopped thyme.
8. Pour the rest of the dough evenly into the pan so that it covers the cheese slices.
9. Bake in the oven for about 40-45 minutes.
10. Let cool before removing from pan.
11. Serve with meats and olives as a savoury snack or with jam as a sweet one. We enjoyed the cake for brunch.


Cake #22 - Banoffee


Friends First Friday Cake - Banoffee.

This week's Friends First Friday Cake I made for my Finnish friend Ella who came to visit for the weekend. Lots of girltime - shopping in Dublin, walks on the beach, talks on the sofa...

My sincere apologies for not updating this blog for two days.

So, besides not posting anything here, I tried to plan my weekend cakes quick but tasty. Friends First Friday Cake was to be served as dessert on Friday evening so I made a more dessert-like one - Banoffee, that is. No baking and, yes, it is cheating to use a can of caramel sauce instead of cooking the sauce yourself... Earlier that day I had baked 26 donuts and for a moment I thought I would call the neat pile of them a cake but that sure would have been cheating!

Banoffee

200 g Digestive Cookies, crumbed
100 g butter, melted
can of caramel sauce
3-4 bananas
300 ml  fresh cream
50 g milk chocolate

1. Mix the digestive cookie crumbs and melted butter.  Press the mixture straight on the serving plate, using a springform pan as the frame.
2. Spread the caramel sauce on top of the base.
3. Slice the bananas and place on the cake.
4. Whip the cream and spread to cover the bananas.
5. Last, grate the chocolate and garnish the cake with it.
6. Remove the springform pan frame around the cake and serve immediately. Do not refrigerate more than a couple of hours as the bananas start turning black very quickly.


Saturday 13 September 2014

Cake #21 - Hidden Cat & Mouse Cake


Thursday Cat Theme Cake - Hidden Cat & Mouse Cake.

- How can you fit a cat and a mouse in da gaff? 
- No way - the cat will eat the mouse. 

- How can you fit a cat and a mouse in da cake?
- Very well, and then you can eat it all!


I have earlier 'revelead' how I made my Hidden Cat Cake and with this cake I used exactly the same recipe. Now I only wanted to make two hidden creatures inside the cake so I divided the first dough in half to get two different colours. The dough for the mouse I coloured with 1 tbsp of licorice powder (I bought it in Finland in the summer) and the cat dough with 2 tbsp of cocoa powder. To bake, I divided the cake pan in half with a piece of foil and it worked great!

Not only is the cake about cats and mice but also about the licorice people and the chocolate people. There are so many people who do not like licorice - and I am not even going as 'extreme' as salty licorice!! - but have I ever heard of anyone who would not like chocolate? I do not think so...

Now, with this cake, I was able to please both the licorice people and the chocolate people. I did not cut my slice in half, though. Best of both worlds!


Friday 12 September 2014

#20 - Melon Surprise


Wednesday Natural Ingredient / Healthy Cake - Melon Surprise.

My daughter had seen pictures of a fresh watermelon cake in Facebook and had said a few times already that she would like me to make this cake. - Cake? Is it a cake? Well, let's see. 

I bought a watermelon, removed the rind and cut the melon into a cylinder. Still a watermelon.The frosting I made by mixing 200 g soft butter, 400 g cream cheese and 400 g icing sugar. Then I spread the frosting all around the cylinder. Still a watermelon, a watermelon with frosting. The little hearts on top of the cake are cut off a watermelon slice with a cookie shape. A garnished watermelon with frosting. Some fresh berries to go with it and...

...12 candles! 

Happy Birthday to my beautiful daughter! Hope you enjoyed your garnished watermelon birthday cake with frosting! 

If nothing else, the candles finally made me call the watermelon a cake.

PS The Birthday Girl will get a proper 'cake-cake' when she is having her party for her friends.

Thursday 11 September 2014

Cake #19 - Le Hamburger


Tuesday Humour Cake - Le Hamburger.


- I would like to bake a hamburger. 
- No, you don't bake hamburgers. You go to Burger King.
- I would like to bake a hamburger. For dessert.
- No, you don't bake hamburgers for dessert. Unless... unless it's a...?
- Cake, yes. I would like to bake a hamburger cake. For dessert.

So I did. No new idea but a fun cake to make! - And now I am playing with the idea of inviting friends over and making several small hamburger cakes and not saying anything that they actually are not savoury ones. I could bake sweet buns and even garnish them with sesame seeds to make them look more real... Watch out!

Le Hamburger

Sponge
150 g soft butter
150 g granulated sugar
3 eggs
150 g self-raising flour
1 tsp baking powder
1 tbsp cream or milk

1. Heat the oven to 190 degrees C (375 F) and grease and flour a Ø 15 cm round cake pan.
2. Mix together the dry ingredients.
3. Cream together butter and sugar.
4. Add eggs and mix well.
5. Add the dry ingredients and cream or milk.
6. Pour the mixture into the pan. 
7. Bake in the oven for 40-45 minutes until solid in the middle.
8. Let cool completely on a rack.

Garnishing
Milk chocolate to make the 'burger'
White chocolate to cover the bun
Chopped nuts to be sprinkled on top of the bun
Yellow fondant icing as cheese
Green fondant icing as lettuce
Raspberry (or other red) jam as ketchup
Whipped cream with a drop of yellow/brownish food colour as hamburger sauce / mayonnaise
Apple slices, pineapple slices... 

The garnishings can be made of nearly of whatever (sweet) you have in your fridge or food cupboard. Just use your imagination!

I cut the sponge in three layers. The middle one was to become the burger so I cut off the crust. The top layer  I brushed with white chocolate and sprinkled with chopped nuts.

The burger I brushed with melted milk chocolate and it does look quite meaty!!

I had a chunk of yellow fondant icing and using a cheese plane I got thin slices of it as the cheese for the hamburger.

On the bottom layer I first spread raspberry jam as ketchup. The on top of the burger I put the 'cheese' and whipped cream and then  in-between stuck some slices of green icing as lettuce and slices of apple. There are also slices of canned pineapple inside the hamburger.
Bon Appétit!